

There are a few reasons you may find yourself needing to learn how to uninstall QuickBooks Desktop. Some examples include:
- QuickBooks won’t start on your computer
- QuickBooks crashes or freezes because it can’t load its own program
- Viruses, malware, or Windows updates corrupted the QuickBooks installation
- A hard drive crash or replacing a hard drive
Whatever the case may be, a complete uninstall is the first step. In this article, we’ll walk you through the process of how to uninstall QuickBooks Desktop while answering some of your most common questions such as:
- Will Uninstalling QuickBooks Delete Company File?
- How do I uninstall and reinstall QuickBooks Desktop?
- How do I completely remove QuickBooks from my computer?

Will Uninstalling QuickBooks Delete Company File?
Before we begin with the steps of how to uninstall QuickBooks Desktop, you may ask yourself ‘will uninstalling QuickBooks delete company file saved to my computer?’ The answer is no. Uninstalling QuickBooks does not delete your company files from your PC. It will only remove the QuickBooks application. However, as a precaution, it’s always a good idea to create a local backup.
How to Uninstall QuickBooks Desktop
Intuit provides instructions on how to uninstall QuickBooks Desktop:
- Open the Windows Start menu. Search for “Control Panel”, then open Control Panel.
- Select Programs and Features or Uninstall a Program.
- From the list of installed programs, select the version of QuickBooks Desktop you’re having problems with.
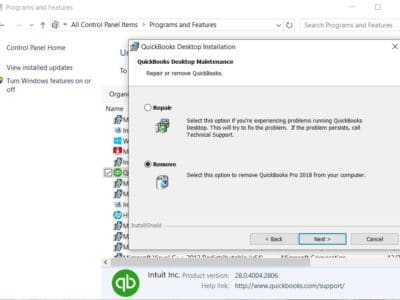
- Select Uninstall/Change and then Remove. Select Next. If you don’t see this option, sign out and sign back in to Windows as an admin (or a user with admin rights).
How do I uninstall and reinstall QuickBooks Desktop?
If you need to uninstall then reinstall, first follow the How to Uninstall QuickBooks Desktop above. To reinstall QuickBooks, you can insert your disk into the computer and follow the wizard setup steps.
You can also reinstall QuickBooks without an installation disk.
To do so, visit https://downloads.quickbooks.com/app/qbdt/products and download your QuickBooks version. Save the download file where you can easily find it to run and install. Once downloaded, follow Intuit’s instructions:
- Click the downloaded QuickBooks executable (QuickBooks.exe).
- Follow the onscreen instructions and accept the license agreement. Press Next.
- Enter the product and license number, then push Next.
- Activate QuickBooks by opening the application.
- From the Help menu, select Activate QuickBooks Desktop.
- Follow the steps on the screen to verify your info.
QuickBooks Won’t Uninstall
If you find that QuickBooks won’t uninstall, we’ll also provide the steps how to uninstall QuickBooks Desktop manually. In this process, you’ll manually rename the existing installation folders. Intuit provides the following steps to follow:
- Uninstall QuickBooks
- Display hidden files
- Open the Windows Start menu. Search for “File Explorer”, then open File Explorer.
- Find and open the folder that holds your QuickBooks company files. This is usually your QuickBooks folder. It’s usually in one of these locations:
- C:\ProgramData\Intuit\QuickBooks (year)
- C:\Users\(current user)\AppData\Local\Intuit\QuickBooks (year)
- C:\Program Files\Intuit\QuickBooks (year)
- 64-bit version C:\Program Files (x86)\Intuit\QuickBooks (year)
- Right-click the folder and select Rename.
- Add the word “old” at the end of the folder name. This prevents QuickBooks from trying to open it when you reinstall.
Keep Your Company File Safe with Qbox!
Qbox is a cloud-enabled collaboration software that helps users share files over the Internet. Files in the Qbox folders on one user’s Windows computer, are synced to the Qbox cloud server and then to the shared users’ Windows computers. If you purchase a new computer, there’s no need to find your latest backup or USB files over. Qbox will automatically sync your data file from the Qbox Cloud at any time. To learn more, visit https://www.qboxplus.com/how-qbox-works/


